
Snagscope has proven to be an effective utility for capturing Periscope broadcasts, but it requires an Android smartphone or tablet to run, which is a drawback for some users. Well, not any longer. In this article, we will show you an easy way to get Snagscope (and Periscope) to run on your Mac or Windows PC.
There are many reasons why you may want to do this. For one, Apple has a long history of removing screen-recording software from the App Store, so it is unlikely that there will ever be an iOS version of Snagscope. Another reason might be because you are planning to edit the captures afterwards, and it is more convenient than having to capture them on your phone and then transfer them onto your computer. Or, perhaps you just want to run Periscope on your computer because there is functionality in the app that is currently not available on the periscope.tv Website. Whatever the reason, we’ll show you how to turn your desktop computer into an Android device, and run Snagscope on it.
Install the Nox App Player
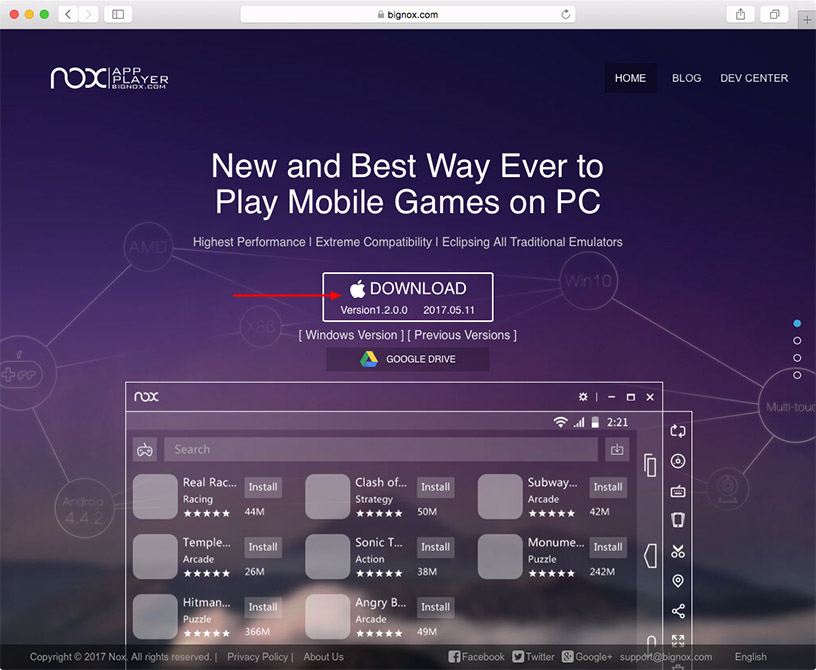
Before we begin, you will need to install the Nox App Player. Nox is a free Android emulator that allows users to install and run Android applications & games on their desktop or laptop computer. Nox is available for both Windows and Mac OS.
Since Snagscope is only available for Android, we will be using the Nox App Player to emulate an Android environment for the Snagscope app to run on. Start by visiting www.bignox.com to download and run the installer.
We chose Nox because it was free, easy to use, multi-platform, and performed well with low overhead. If your criteria differs and you prefer to use another emulator, you should be able to replace Nox with any Android emulator of your choosing, and still follow a procedure similar to the one outlined below.
Install Periscope and Snagscope
Nox supports multiple emulator instances. Once the installation is complete, click Start to launch the default instance. This will boot into an Android home screen. Then click on the “Play Store” icon to launch the Google Play Store so that we can install the Periscope and Snagscope apps.

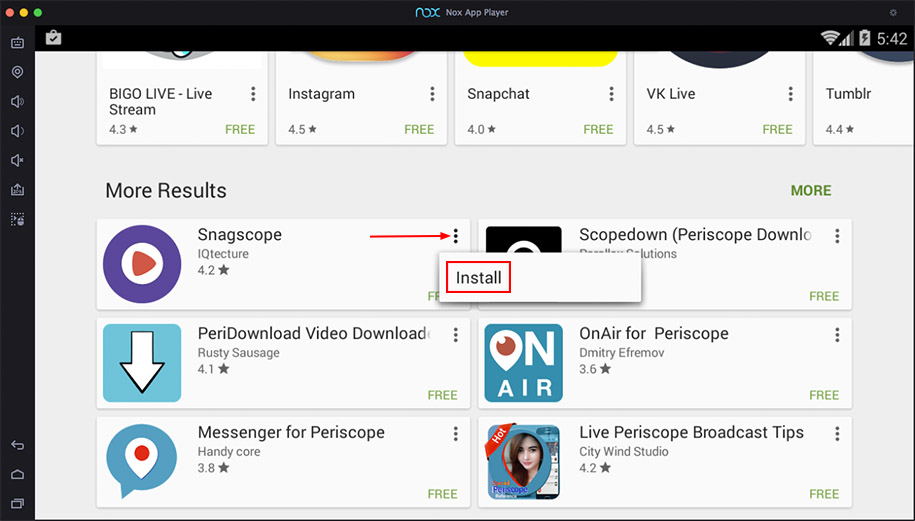
The first time the Play Store is started, you will be prompted to Add a Google Account. Either sign in with an existing Gmail address, or create a new one. Once Google Play loads, enter “periscope” into the search field, and install the “Periscope – Live Video” app. Then scroll down to More Results, and install the Snagscope app.
Return to the home screen and click on Periscope to launch the app. Log into your Twitter account, and then exit the app. This will allow you to launch into the Periscope app from the Snagscope app to view the broadcasts.
Configure Snagscope settings
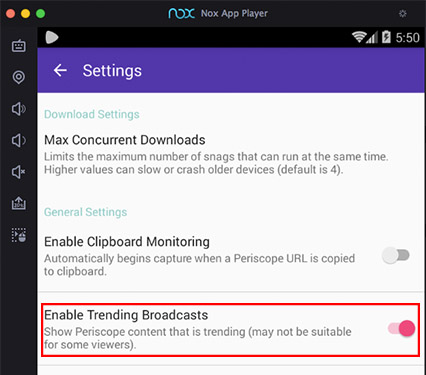
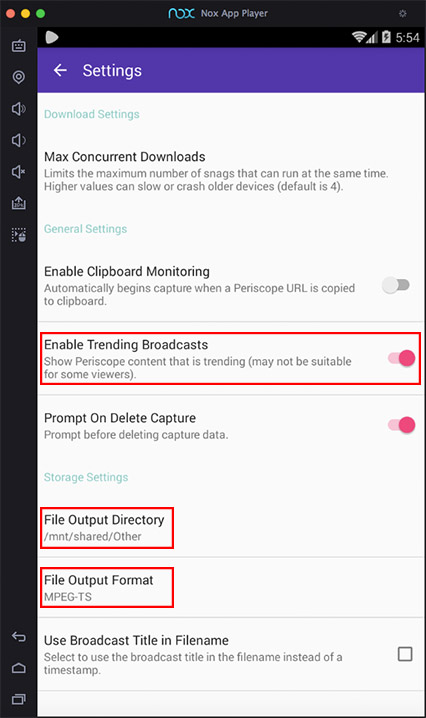
Once Snagscope is installed, return to the home screen and click on its icon to launch it. Select “Settings” from the menu, and enable the Trending Broadcasts feature. This will allow you to quickly snag (capture) a video from a list of trending Periscope broadcasts. This is easier than copying a share link from Periscope and pasting it into Snagscope.
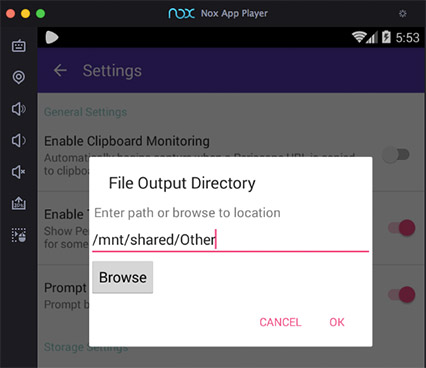
Then, select the File Output Directory setting and either Browse to the following location or enter the path manually:
/mnt/shared/Other
This will ensure that the files output from Snagscope are saved to a designated location on your computer.
Finally, change the File Output Format from MP4 to MPEG-TS. This is necessary because Snagscope only supports MP4 transcoding on ARM based processors. The result will be .ts video files, but they are still playable on both Mac and Windows, and can easily be converted to MP4 if necessary.

Once these changes have been applied, your view of Settings should look somewhat similar to the following:
Exit Settings and return to the Snagscope home screen. You are now ready to begin recording Periscope broadcasts.
Save a Periscope broadcast
A quick way to begin recording a Periscope broadcast is from the Trending tab. Selecting this tab will populate a list of broadcasts that are currently trending on Periscope. If you spot one that looks interesting, you can press and hold on the row, and Snagscope will start capturing the broadcast.
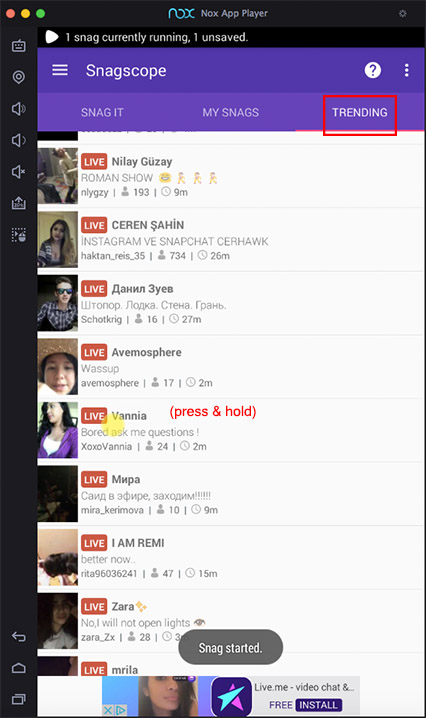
After you have started a recording, you can switch to the “My Snags” tab to monitor its progress. When the broadcast ends it will show a status of DONE. If you want to end it sooner, click on the broadcast and select “Stop Capture” from the popup menu. Once the capture is either DONE or STOPPED, you can select the capture again and click “Save to File” to produce the video file.

The file will be saved to the “/mnt/shared/Other” directory that you configured earlier. When the save operation completes, the status will show as SAVED, and you will be able to watch the video.
Play the video file
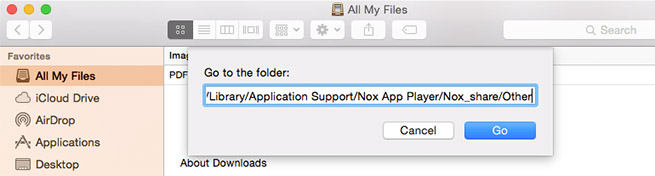
On Mac OS, Nox will map the “/mnt/shared/Other” directory to:
~/Library/Application Support/Nox App Player/Nox_share/Other
From the Finder, use the Command+Shift+G shortcut to bring up the “Go to Folder” dialog. Copy the path above into the text field, and press Go.
On Windows, the location of the capture files is:
C:\Users\<USERNAME>\Nox_share\Other
In the folder you should see the capture file that you just saved. Click on it to launch the video and watch your recording.

(Optional) Convert video to MP4 format
In the event that you want to share your video file or upload it to a Website like YouTube, you may need to convert the video file from MPEG-TS format to MP4. There are plenty of video conversion tools out there, but a quick, free, and simple utility which you can use is FFmpeg. You will need to install this for your OS first. Once it’s installed, open a terminal window (or command prompt), navigate to the directory where your file resides, and run a command like the following:
ffmpeg -i input.ts -c copy -bsf:a aac_adtstoasc output.mp4
Replace “input.ts” with the name of the file that you would like to convert, and “output.mp4” with the output file name that you would like to use. When the command completes, you should have an MP4 file that can be viewed with any MP4 player and may be uploaded to any Website.
Thanks for your support
We hope you found this tutorial useful, and wish to thank you for all the positive feedback that you’ve given us regarding Snagscope so far. As always, if you have any questions or comments, feel free to reach out to us at snagscope@iqtecture.com.
If you like Snagscope, please make sure to rate it in the Google Play Store, and help us spread the word.

Very comprehensive tutorial, thank you 🙂
LikeLiked by 1 person